


This is an old revision of the document!
Chapter 7 - Artwork Templates
TEMPLATES SETUP
The RealTimeDesigner has a powerful artwork template system that allows you to create layouts that
your customers can select and edit to their liking, thus creating semi-original designs with little effort,
very quickly. Keep in mind that Artwork Templates and Clip art are not the same thing. Templates are made up of
any number of clip art and text items. Once a template is saved, users can edit individual pieces of the
template. Other than color, clip arts can not be edited by the users.
Keep in mind that Artwork Templates and Clip art are not the same thing. Templates are made up of
any number of clip art and text items. Once a template is saved, users can edit individual pieces of the
template. Other than color, clip arts can not be edited by the users.
TWO TYPES OF ARTWORK TEMPLATES
The RealTimeDesigner system has two types of artwork templates - it is likely that you will choose only one type and ignore the other type. The two types - product specific and general templates - are described in the following paragraphs.
PRODUCT SPECIFIC TEMPLATES OVERVIEW
Product Specific Templates can be very detailed including borders, sides, special effects, etc. Their limitation is that they contain many data features that are not likely to be included with other products thus they only work for that specific product. The customer cannot take a design they create for their shirt directly to your mug designer. Product Templates are described in more detail later in this chapter.
GENERAL TEMPLATES OVERVIEW
As the name implies, General Templates can be used on several products. They usually re-size and conform to most any product defined in the RealTimeDesigner. But they do have limitations. General Templates can only contain a single design (no products with designs on opposite sides). As well, some features including borders will not function with general templates. The benefit is General templates can apply to any product. The artwork in the template is stretched or squeezed to fit the given size and users can reuse their artwork on any of the products you offer. Templates should be designed with an mediocre aspect ratio. Typically, a template can be stretched or squeezed by a factor of 2 while maintaining legibility. If you have more than one product which you print or customize, we recommend that you use General Templates.
GENERAL TEMPLATE CATEGORIES
The first step to creating General Templates is to create Template Categories to organize the templates. Sub-Categories can also be created to provide further organization if you are going to be utilizing a large number of General Templates. Product Specific Templates do not utilize the category concept because they are not used across various products.
BUILDING YOUR FIRST TEMPLATES
To generate either type of template, begin by logging in to your designer Admin Panel. Once in, launch
the designer. You will notice a box labeled ADMIN COMMANDS with four buttons which are visible
for admin use only.  Using the Designer, create your template consisting of text and clip art objects. Do not upload clip art when creating templates as uploaded artwork can not be
accessed by users other than the person that uploaded the clip art.
Using the Designer, create your template consisting of text and clip art objects. Do not upload clip art when creating templates as uploaded artwork can not be
accessed by users other than the person that uploaded the clip art.
THE GENERAL TEMPLATE
In the RealTimeDesigner, a template is little more than a design created in the designer window. Once you have the artwork elements (clip art) in the RealTimeDesigner system, creating an entire library of templates can be relatively fast. Given a reference picture of the template design, anyone with minimal RealTimeDesigner experience should be able to replicate the artwork into templates in 2 or 3 minutes each. If you desire to create a large library of templates, contact us. We can outsource this work for you very inexpensively.
CONTROLLING GENERAL TEMPLATE EDITABILITY
As administrator, you can control what users can and can't do within templates. By clicking on the
SHOW ADMIN OPTIONS BUTTON you can lock any or all of the properties of each element within
the template. Be careful not to be too restrictive - your templates may not allow end users the flexibility
they need. 
SAVING GENERAL TEMPLATES
Once you have created some template categories you can begin saving templates into those categories.
While logged into the administration panel, open the designer in another tab or window of your internet
browser. You should notice that when logged in to the admin panel, you have additional controls
available in the designer. The GENERAL TEMPLATES button in the ADMIN commands gives you
access to the ability to save templates. To save a template, simply give it a name and select the category
to store it under. Remember, site visitors will not see these admin controls and thus will not have the
ability to create templates or perform other admin actions.
TURNING CUSTOMER DESIGNS INTO TEMPLATES
Turning User Designs into Templates is quite easy. From within the admin panel > manage orders > view order screen, click on RE-IMPORT IN DESIGNER button to open the user's design into the designer. Once opened in the designer, you will have all the template tools mentioned earlier. You may chose to edit the text slightly to protect your users privacy. Do not create templates from designs which include customer uploaded artwork. You may chose later to clean up your old file storage and this could render templates using that artwork to become unusable.
MANAGING GENERAL TEMPLATES
From the Admin panel, click MANAGE GENERAL TEMPLATES, then select the template category to
display all of the templates within that category. From there you can rename templates, move them to
other categories and change their allowable aspect ratio. You must SAVE CHANGES for one template
before editing another.
KEEP GENERAL TEMPLATES GENERAL
As general templates can be used with ANY of your products, remember to use the most compatible product you have while designing/saving them. For example, if you've created a template using a product that uses borders and your users will open it in a product that doesn't, result would be a discarded border. Not good. So, ALWAYS use a product which has settings shared with all your products. In one word: the most basic one you have. If you can settle with one aspect ratio - say 10×10 inches - make a product called “test product” with no background images - just a square design window 10×10 inches. Use this test product to make your templates. That way the customer won't be confused by seeing a t-shirt when he wants to see a banner for instance. If the product you used to create the template has a background image, the template thumbnail will show the background image (i.e. shirt). Once he chooses a template the artwork will open in whatever product he chooses less the background. If you prefer that some template categories don't show for certain products, use the “DISALLOWED TEMPLATE CATEGORIES” in Product Configuration section.
EDITING GENERAL TEMPLATES
Here's the steps for editing templates: 1) Login to admin panel 2) Launch RTD generator with blank design 3) Click on the ADMIN COMMANDS: GENERAL TEMPLATES button 4) Navigate to the desired template in the “Show Saved General Templates in:” pull-down at the bottom of the screen 5) IMPORT the desired template 6) Make edits to template once it finishes loading 7) Click on the ADMIN COMMANDS: GENERAL TEMPLATES button again 8) Click on SAVE OVER LAST IMPORTED I'll put together a video on this topic soon too. Regarding the latest question… I'm not following you fully so I can't answer - the best way to know for sure is to try with a couple test files. Keep in mind you can also delete or move templates in the admin panel.
TRICK FOR UPDATING TEMPLATES
Just thought of something we are doing for our magnetic calendars - we make the year a clip art then change the clip art annually - it is automatically updated in the template by doing this. It is also very quick since the same clip art can be used in several templates. I clip art change changes all those templates. If that isn't feasible, please let us know.
TEMPLATE ASPECT RATIO
The ratio of height to width is also called the aspect ratio. When you save a general template, you will see the current Aspect Ratio of the design displayed. There are also 2 text entry boxes asking for minimum and maximum aspect ratios. Use of the aspect ration feature is optional. If you enter values in these boxes, this template will be displayed only when the user selected size is within that range. This prevents users from trying to force a nearly square design into a long, skinny area. You can build a very powerful template system if you can offer similar designs in a few different aspect ratios to cover the range from short-wide designs to tall-skinny designs. You can control what templates are shown based on the product height/width ration using the aspect ratio filters. You may need to create each template theme in a few aspect ratios so that it applies correctly to your range of products. For instance, one RealTimeDesigner user has about 30 standard political sign templates which they have created in 4 aspect ratios each so that they can be applied to products ranging from 15w x 3h bumper stickers all the way to 6w x 24h vertical political rally signs.
SETTING UP LINKS TO TEMPLATES
The RealTimeDesigner is set up so that you can set links from your existing website to direct users into the system with the Product, Size and Template predetermined. This is useful if you want to preset options for the user. For instance, if you service a national account, you may wish to build a page on your site highlighting products for that client. You would then put links on your site to pre-load the RealTimeDesigner with that product/design combination. To do this, from Admin Panel, click on the CATALOG link near the top left of the page. This will launch the RealTimeDesigner catalog for your company. To get a direct link, navigate through the catalog to the level which you wish to send your customers. As you select each option, you will notice the URL in your browser grows in length. Copy this URL info to your clipboard and paste it into your own website as a link. Then when your users click on that link in your website, they will be directed directly to that entry point for the RealTimeDesigner. Your users will avoid having to find the way themselves to the products you have set up for them. Remember, you can copy the URL link for a particular product, a particular size, and even a particular template. The hardest part is organizing your existing site to logically direct your users into the RealTimeDesigner at the appropriate point.
LINKING TO GENERAL TEMPLATES FROM EXTERNAL PAGES
For those of you who link to TEMPLATES in the RealTimeDesigner directly with thumbnail images on your own site, we've got a solution…. You can now generate a delimited text file containing information directly from the RTD database. This is a lot easier than copying and pasting hundreds of links to create static pages. In the admin panel, under templates, choose “General Templates Raw Export” Select the category, product, and size and enter a export string such as: ”[TPL_NAME]”,”[TPL_LINK]” Then CREATE FILE. You will get a .txt file formatted like this:
“templatename1”,”http://designer.realtimedesigner.com/yourcompany……….”
“templatename2”,”http://designer.realtimedesigner.com/yourcompany……….”
“templatename3”,”http://designer.realtimedesigner.com/yourcompany……….”
[TPL_NAME] and [TPL_LINK] are codes for variable names. There are similar codes for thumbnail images of each template.
TEMPLATE MASS LINK BUILDER
While logged into the admin panel, when you click on CATALOG, you will see a button at the top of the screen labeled TEMPLATE MASS LINK BUILDER. Navigate through the catalog to the point where you are displaying the templates for a particular category. Click on the TEMPLATE MASS LINK BUILDER button. A new screen will appear with all of the templates displayed in a simple HTML table format. From your browser, Right Click > VIEW SOURCE, then copy the HTML source for that page. You will then capture the raw HTML code for the template links and images for that template category. You can paste that code into your own web page as an easy way to avoid typing all of the image names and links. You will likely need to reformat the table to suit your needs, but it will be much easier than building this page from scratch. Those companies that are using templates find them invaluable. If your product and clientele lends themselves to template use, you should give it a try. If you need additional assistance understanding the principles of templates or would like us to build your entire template catalog, please drop us a line.
GENERAL TEMPLATES EXAMPLE SITE
You can get an idea of the flexibility of templates at this site: http://designer.realtimedesigner.com/stickerz/catalog/index.php&p=cGM9MTQmcHI9NzUmc2M9MT Qw&scw=22&sch=12 [b]CREATING TEMPLATES[/b]
PRODUCT SPECIFIC TEMPLATES
Just like General Templates, Product Templates are created in the designer while logged into
the Admin Panel. Just like General Templates, Product Templates are saved from the admin navigation bar. A pop-up will notify you that the Product Specific has been saved.
CONTROLLING PRODUCT SPECIFIC TEMPLATE EDITABILITY
As administrator, you can control what users can and can't do within templates. By clicking on the
SHOW ADMIN OPTIONS BUTTON you can lock any or all of the properties of each element within
the template. Be careful not to be too restrictive - your templates may not allow end users the flexibility
they need. 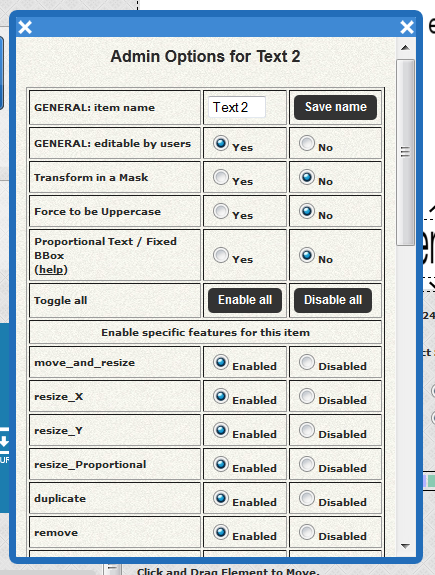
PROPORTIONAL TEXT
A very powerful control in the SHOW ADMIN OPTIONS window is the ability to lock the text size and allow the text to flow longer or shorter than the bounding box containing the text. It is likely that you will also want to control the justification of that text. The PROPORTIONAL TEXT control shown below is the answer.
 When you turn this feature on, the window will expand to show justification options. At the time this feature is activated the bounding box of the text is stored. Any attempts to resize, relocate or otherwise change the bounding box should be avoided because the text will “jump” back to the saved bounding box that was set at the time of activation. When the PROPORTIONAL TEXT feature is activated the bounding box is the MAXIMUM size of the text. Fewer characters will result in the text string shortening, keeping the set justification. If you enter more characters than the string contained when PROPORTIONAL TEXT was activated, the text will shrink in size to fit within the bounding box maximum. You can shorten the text string after the proportional text feature is activated to make you templates more appealing. This is a lot to chew on so here's the steps for creating a typical template containing the PROPORTIONAL TEXT feature:
- Design your template as you would any other RTD design except use text strings that are very long. i.e. Instead of entering JOHN DOE enter JOHN DOEXXXXXXXXXXXXXXXXXXXXXXXXXXXXXXXXXXXX so that the X's act as place holders, taking up the amount of space you wish to allow for the template maximum.
- Activate the SHOW ADMIN OPTIONS > PROPORTIONAL TEXT feature
- Select the appropriate justification
- Disable the SHOW ADMIN OPTIONS > MOVE AND RESIZE options
- Close the SHOW ADMIN OPTIONS window
- Edit the text string, removing the X place holders
- Repeat as necessary to complete the design
- Save the design to the cart and select any quantity
- From the CART, click SAVE AS PRODUCT TEMPLATE
- Users will then see the expected results when they work with the template
LINKING TO PRODUCT SPECIFIC TEMPLATES
In the designer Admin Commands frame, select the PRODUCTS TEMPLATES button. A pop-up will display your Product Specific Templates along with links to delete each as well as a direct external link. By copying / pasting these links, you can allow users to access the template from any web page.
CONCLUSION
The RealTimeDesigner's powerful template engine sets it apart from other web-based design programs.
This makes it the perfect tool for producers of customized products. The well thought out approach can
lead to increased sales from new users, up sells and cross sells. Dig in and get started.![]()