This is an old revision of the document!
Chapter 6 - Libraries
LIBRARIES
Colors, Fonts and Clip Arts are stored in central libraries so that they can be easily called upon at various places in the system. Setting up the libraries can be time consuming if the default values don't work for you and your system is complex, but you will be able to recall the libraries very easily when setting up individual products.
LIBRARIES VS. PRODUCT ASSIGNMENT
The single most frequent question by new RTD clients is related to a misunderstanding of the concept of master libraries and assignment of the libraries at product level.
- If you add new fonts, clip art categories or colors to the libraries, they do not appear in your products automatically.
- You must assign the new fonts, clip art categories or colors to previously defined products.
- You can not add a color to a product until it has been defined in the library.
COLOR LIBRARY
The Color Library consists of a list of all the colors you will be using for your products - both design colors and the colors of the products themselves. The RealTimeDesigner uses can use any of the millions of RGB colors, but rather than displaying rainbow color wheels for users, the RealTimeDesigner is configured to use specific RGB colors that you choose. This confines users to choosing from colors that yield predictable results. We've found that the color wheel selectors often print very differently than displayed on monitors, leading to unhappy web shoppers.
ADDING NEW COLORS
To add a new color to your RealTimeDesigner library, go to LIBRARIES > DEFINE COLORS. The
color table consists of SHOW ORDER, RGB VALUES, NAME and COLOR SOURCE columns. The
SHOW ORDER is used to sort the list in whatever sequence you prefer. If two or more colors have
matching SHOW ORDERS, these colors will be sorted by name. The RGB (Red Green Blue) column
is where color values are entered. The numbers can be any number from 0 to 255. These values are
NOT hexadecimal. There is an exhaustive RGB color chart at http://rgbchart.com/ and a simpler one at
http://en.wikipedia.org/wiki/Web_colors There are countless other versions available by searching the
web. Enter the color name in the NAME column. If the color is specific to a brand or product, enter a
name for the COLOR SOURCE, perhaps ORACAL VINYL or HANES. Be sure to click the ADD
NEW button before proceeding.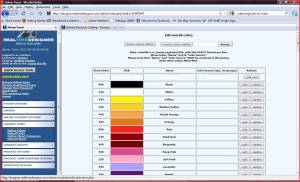
EDITING COLORS
You can edit or delete colors from the list by clicking on the buttons to the right of the color. These changes are final and can not be undone.
DEFINING COLOR GROUPS
The LIBRARIES > DEFINE COLOR GROUPS screen allows you to group any number of colors from
your color library into named groups. Later, when defining products, color assignment can be as easy as
selecting the “TEXTILE INKS” color list.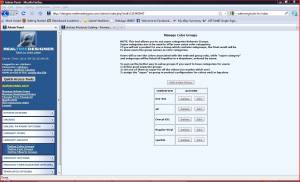 From the Define Color Group screen, click ADD A NEW GROUP. A complete list of your colors will
be shown along with check boxes next to them. Place a check next to each color you wish to include in
the group. Once you have selected all the colors to be in that group, click on the SAVE COLOR
GROUP button.
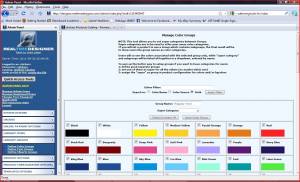 When your color list gets really long, checking all the colors of a new group can be tedious. The
COLORS FILTER box allows you to filter the colors by the COLOR SOURCE used when defining the
colors. If you entered HANES for the COLOR SOURCE for all HANES colors, you could then enter
HANES in the filter box and select the HANES BEEFY T colors for the new group. OF course,
individual colors can be used in multiple groups.
IMPORTING / EXPORTING COLOR CHARTS
The RealTimeDesigner allows you to import or export lists of colors or color charts. The EXPORT
COLORS button will create a list of the current colors that you have in your system. Before trying to
import any new color charts, export the color list and study the format. Keep in mind that imported
color charts are loaded into the color list, but color groups. You will need to create your own groups
once the colors are loaded.
SUPPLIER COLOR CHARTS
We've created numerous manufacturer color lists and placed them online at http://realtimedesigner.com/color_charts/colors.html To load the values into your system, in the ADMIN PANEL go here: LIBRARES OPTIONS > DEFINE COLORS > IMPORT COLOR FILE. You should open each file in excel and renumber the show order field so that the numbers don't overlap any of your existing color SHOW ORDER values. USING COLORS AT PRODUCT LEVEL The LIBRARIES SETUP section is the first part of using colors with your products. Now that you have defined the colors and color groups, you will need to set up each new product to use these colors. The PRODUCTS SETUP chapter will give you more details on using these colors with your products.
FONT LIBRARY
Any lettering inside the designer is done using fonts from your font library. The RealTimeDesigner
uses standard TTF font files. Several generic fonts are loaded in the default setup, but you are
encouraged to create your own list of fonts. Because of licensing rules, commercial products such as
RealTimeDesigner can not include fonts that are free throughout the web.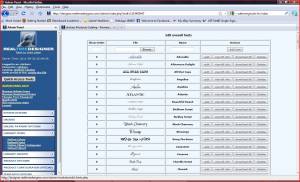
ADDING NEW FONTS
The LIBRARIES SETUP > UPLOAD FONTS screen is used to upload new fonts. Like most other lists in the RealTimeDesigner, the Show Order column is used to sort the fonts in your list. If this field is left blank, the fonts will be sorted alphabetically. Upload the font TTF file using the BROWSE button. The NAME field is used because many font TTF files have cryptic names. You can also rename fonts to completely different names. Click the ADD NEW button activate the font upload.
VIEWING AND DOWNLOADING FONTS
You can view and download the fonts that are currently in your system. The VIEW TTF button will show you an example of the font as well as the details about the font creator. The DOWNLOAD TTF button will allow you to load the font onto your local computer so that you can ensure your design software will have these same fonts available.
DELETEING FONTS
The DELETE button will delete the font from your RealTimeDesigner system. Deleting is permanent and can not be undone. We recommend that you keep a backup copy of any fonts that you previously offered just in case past clients come back requesting minor changes to their work.
DEFINING FONT GROUPS
If you are going to have lots of fonts on your system, FONT GROUPS will be useful. By grouping
fonts you can create pages of fonts such as STANDARD FONTS, CURLY FONTS, FREEHAND
FONTS, SCRIPT FONTS, etc. These fonts will be shown on tabs so that users will not be
overwhelmed by a very long list of fonts.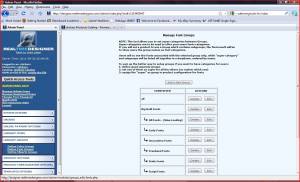
To define a new font group, click on ADD A NEW GROUP. The screen will change to show a list of all fonts on your system along with four text entry boxes. Enter the name of the font group in the GROUP NAME box. Select the fonts you wish to include in this group and click ADD NEW FONT GROUP. Individual fonts can be used in more than one group if you desire. The SUPER CATEGORY pull-down allows you to create nested lists of fonts which will display as pull down options for all groups that are nested below a top level group.
FONT RENDERING
When a users selects the FONT tool while using the designer, the list of available fonts can be shown in
many ways. The list is configurable and can show the fonts by name in the standard text (FONT
NAMES option), the font name can be displayed in that font (FONT IMAGES option) or the actual
text being edited can be displayed in the list (DISPLAY TEXT option). There are rendering options
that allow you to set the default rendering style as well as which of those three options are shown to
your users.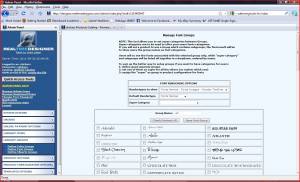
USING FONTS AT PRODUCT LEVEL
Just like colors, defining fonts is only the first part to using fonts in the designer. You will also need to enable each product with the fonts you wish to use for that product. The RealTimeDesigner does not require that all products have every font in your system. This is useful for when certain fonts don't work well with particular products. CLIP ART LIBRARY The RealTimeDesigner comes with a fair selection of clip art installed. You can also upload your own clip art If you prefer, you can disable the system clip art and use entirely your own clip art System clip art and your own clip art are treated different in the RealTimeDesigner. While you have full edit-ability of individual clip arts that you upload, you are limited to turning system clip art categories on and off. You cannot control individual system cliparts.
RTD CLIPART
TheRealTimeDesigner has several thousand pieces of clip art meant to appeal to a wide variety of users. The clip art is referred to as System Clip Art. Each client of RealTimeDesigner also has the ability to upload their own clip art into the system clip art categories or create their own categories. System clip art can be turned off by category, but companies do not have access to individual clip art files.
DEFINING CLIPART CATEGORIES
Before you can upload clip art, you must define categories to organize the clip art. Click on the LIBRARIES > DEFINE CLIPART CATEGORIES link. The Clip art Categories screen contains columns for SHOW ORDER, NAMES and IMAGE. The SHOW ORDER is a numerical value that is used to sort the names of the categories. If this field is left blank or if two or more names have matching values, the names will be shown alphabetically. Enter the name for the category in the NAME field. If you wish, you can include an image to be displayed whenever the user is browsing the clip art categories in the designer. If you choose to use image, be consistent - include an image for every category. Be sure to click ADD NEW before moving from this screen.
EDITING CLIPART CATEGORIES
The Define Clip art Categories screen has options to make the category VISIBLE or HIDDEN. There are also EDIT and DELETE buttons. Changes to these are permanent and can not be undone.
UPLOAD CLIPART SCREEN
Once you have clip art categories defined, you can begin uploading clip art the LIBRARIES >
UPLOAD CLIPART link will display the clip art upload screen. To enter the screen select the
appropriate category from the pull-down list. A screen with a MASS ACTIONS section and a
DETAILED VIEW - GALLERY VIEW showing all the clip art in that category will appear. Upon
loading, the clip art is shown in GALLERY VIEW. 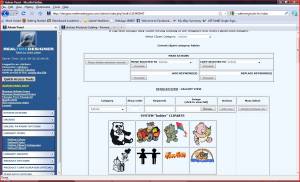 Clicking on DETAILED VIEW will reveal all of
the data regarding each clip art.
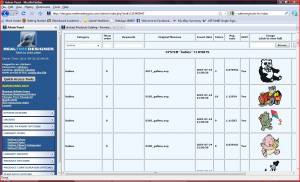
UPLOADING CLIPART
Just below the DETAILED VIEW - GALLERY VIEW links is the clip art upload function. Use the BROWSE button to find the clip art file on your local machine. If you desire for your clip art to be search-able, enter keywords in the KEYWORDS box. KEYWORDS are entered simply as strings of text with no commas or other punctuation. Click on the ADD NEW button to initiate the upload. Valid files types for clip art include GIF, JPG, EPS, PS…..
CLIP ART MASS ACTIONS
At the top of the Clip art Upload screen is an area titled MASS ACTIONS. This section was developed to assist you in editing groups of clip arts rather than doing so individually which can be time consuming. To utilize this feature, select each clip art that you wish to perform the same action on by placing check marks in each MASS SELECT box below the clip art images. MASS ACTIONS include MASS DELETE, MASS MOVE, MASS COPY, MASS REPLACE KEYWORDS, MASS ADD KEYWORDS. Be very careful using the mass actions as these operations can not be undone and a lot of changes can be made to your site with just a few clicks.
CLIP ART GROUPS
The Clip Art Groups tool allows you to include several clip art categories within a group. Typically, our users have a clip art group named GENERAL and then other specialty groups. The general group contains all the normal clip art categories. This makes assigning clip art categories at the product level much easier. Rather than pick each clip art category for each product, you can simply assign a clip art group to a product with one click. Another advantage is that later you can add or delete categories in that group and the changes will be reflected in all products using that clip art group name. If you don't use groups, you will have to redo the CONFIGURE CLIPART CATEGORIES for each and every product that is affected by the category change.
MANAGE CLIPART GROUPS
To add a new clip art group, click the ADD A NEW GROUP button on the LIBRARIES > MANAGE CLIPART GROUPS screen.
**[REWRITE THE FOLLOWING]**
NOTE: This tool allows you to set super categories between Groups. Super categories are to be used to offer your users clip art categories If you will set a product to use a Group which contains subgroups, the final result will be to show users the group names as clip art categories. Users will so see the clip arts associated with the selected group only, while “super category” and subgroups will be listed all together in a drop-down, ordered by name. To sum up the better way to setup groups if you want to have categories for users:
- define good separate groups
- set one of them as super for all the others (no matter which one)
- assign the “super” as group in product configuration for clip arts
Clip arts groups have precisely super-categories. As written in that page: [quote] NOTE: This tool allows you to set super categories between Groups. Super categories are to be used to offer your users clip art categories If you will set a product to use a Group which contains subgroups, the final result will be to show users the group names as clip art categories. Users will so see the clip arts associated with the selected group only, while “super category” and subgroups will be listed all together in a dropdown, ordered by name. To sum up the better way to setup groups if you want to have categories for users:
- define good separate groups
- set one of them as super for all the others (no matter which one)
- assign the “super” as group in product configuration for clip arts
USING CLIPART IN TEMPLATES
You need to create any complex drawing elements OUTSIDE of RTD and insert them as clip art. RTD
is not a full drawing program - it provides limited capabilities for the end user to assemble his design. If
the customer has the ability to draw a surfboard, he probably already has a more powerful drawing tool.
As far as changing colors of clip art, simply upload the clip art in EPS vector format. If the clip art has 4 or
less colors, you will be able to individually assign colors to it. When you upload your clip art, verify
that it has a limited number of colors by looking at the clip art details. If your 2 color clip art shows as
have 256 colors then your settings in the program that created the clip art are not correct. Each version of Corel and Adobe seems to handle EPS exports slightly differently and require the fine details of the export settings tweaked. If you are still
having problems once you try this, please let us know with complete details so that we can pinpoint
your problem.


