Chapter 2 - Company Setup
INTRODUCTION
The RealTimeDesigner will allow you to offer one or many customizable products through your website in a “Design Online” environment. Rather than reinventing the wheel for each product you wish to offer, the RealTimeDesigner uses a core set of data. Things like your logo and color scheme are stored in the COMPANY SETUP section of the Administration Panel. Likewise, colors palettes, lettering fonts and clip art images are installed through the Administration Panel and can be recalled for use by individual products. This chapter will guide you step by step through the COMPANY SETUP process.
NOTATION STYLE
Throughout this manual, we will be giving you instructions about accessing or setting information in the Administration Panel. We will use notation in the following style: “To enable the Registered Users module select REGISTERED USERS > ENABLE REGISTERED USERS > YES”
The bold capital letters above tell you what to select from the Administration Panel. The ”>” character is used to separate the menu selection steps. In the example above you will select the REGISTERED USERS section from the Left Menu of the Administration Panel, followed by the link for ENABLE REGISTERED USERS and then finally select the YES button that is displayed.
THE ADMIN PANEL
Your entry point into the RealTimeDesigner “back end” is called the Admin Panel. This web interface provides access to
all of the tools and data of the RealTimeDesigner. Using your web browser, navigate to the following address:
http://designer.realtimedesigner.com/admin
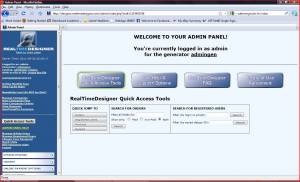
Enter your login name and password. A screen similar to the following will appear.
 Click on the image to enlarge it. Use the BACK button on your browser to return to this page. The left of the Admin Panel contains the menu panel for the RealTimeDesigner back end. Notice that there are several links with many white buttons below. Clicking on the white buttons of the menu panel causes them to expand, revealing additional links.
CONTACT INFORMATION
The Company Setup screen is where you should start in setting up the RealTimeDesigner. Information entered on this screen will be the core of all the work you do on the RealTimeDesigner. Enter the email address that you wish for your clients to see as the reply to address. Enter your homepage web address so which will be linked when users click on your logo while inside the RealTimeDesigner.
CHANGE YOUR PASSWORD
This link will allow you to change your password.
MANAGE ADMINSTRATIVE USERS
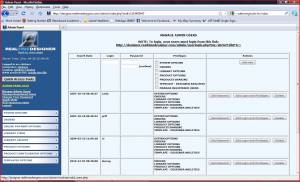
If your site will have more than just yourself working within it, you should use this feature to assign
privileges to each person. Their login name can also be viewed at various points within the system to
show who did what and when. The first thing you will see on the Manage Administrative Users page is a link. This link is necessary
for any users other than yourself. If they try to log in on the same link you log in, they will not be
given access.
You can choose which areas of the RealTimeDesigner each person should have access to. Options include: SYSTEM OPTIONS, ORDERS, LIBRARY OPTIONS, PRODUCT OPTIONS, PRODUCTS SHARING, TEMPLATES, REGISTERED USERS. If you have someone working on artwork only, and processing orders, limiting their access to only ORDERS will greatly reduce the chances that they cause problems within your site.
CONFIGURE EMAILS
The RealTimeDesigner has several built in system emails that are sent at various times. The CONFIGURE EMAIL screen is where you control whether these emails are sent and what they contain. Built in emails include ORDER SUBMITTAL TO COMPANY, ORDER SUBMITTAL TO CUSTOMER, USER REGISTRATION, SEND TO FRIEND, and REGISTERED USER SAVED DESIGN. These system emails can contain HTML codes as well as special codes which act as variables, placing customer specific data in its place. The system emails are sent at specific times. In the Orders chapter you will read about another email feature that allows you to manually send an email at any time, regarding any order using powerful templates.
STATS
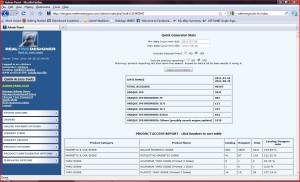
The Quick Stats link will show you total accesses to your site along with what browser the visitors
used. You can refine the dates for the reporting if you are tracking total hits to your site. The are two YES - NO buttons on this screen. The first will lets you display these stats to include only
external links or the combination of external and internal.
The second button will show visitor stats for individual products when you select YES. You can see
which products are being viewed most often. The table that is displayed can be sorted in ascending and
descending order by clicking on the column headers.
The Resource Stats link shows stats about your site that are used in billing.
CONCLUSION
The COMPANY SETUP steps described in this chapter are an essential base for your
RealTimeDesigner site. Careful planning will reduce the chances that you will need to make changes
to these items on a frequent basis. Rest assured though that if you later decide something in the
COMPANY SETUP area is not quite right, any changes made to the COMPANY SETUP items
described in this chapter at a later date will automatically be reflected in your products. Let's move on
to discuss PRODUCT SETUP in the next chapter.